Heather M
5 Stars ⭐️⭐️⭐️⭐️⭐️

Multi-Tool*
Product Type Samples
Compression Tube Color Samples
Indow Tape Measure
Adjustable Diagonal Extension Tool
*See appendix for all uses of this tool & more measurement tips & terms.

Other Tools to use: Online Portal - Record your measurements as you go on the Measure Form provided. Our online portal, Measure by Indow®, is where you record your final measurements. You should have received an access link via email. If you can’t find it, go to Measure Support
Measurement Phone Support - We have in-house measuring experts dedicated to helping you measure your windows and resolving any issues you may run into. If you need assistance, we’re here to help: 503.284.2260
NOTE: Keep the USPS shipping box and return label the Laser Measuring Kit came with. You’ll need them to mail the kit back to Indow! Return all items so you’re not charged for them.

Remove any furniture around the windows for easy access and a more accurate measurement. If you have blinds that have to be removed, now is a good time.
Review the paper Measure Form included in the kit. Use this to list each window you measure. We suggest starting with the leftmost window and moving right.
If you were sent mullion* instructions by your Fit Specialist, refer to the Mullion Guide handout to install the L brackets before measuring.
NOTE: Measuring a lot of windows? Start with 3 or 4, then enter measurements into the Measure by Indow portal to make sure they are accepted before continuing. *See appendix for more.

Frame step is the flat surface within your window frame and where your insert will be installed. Frame depth* is how deep your frame step is. If you think of the window frame width as left to right, frame depth is front to back. Place your laser tool on your desired frame step and point straight across. Record the Frame Depth on your Measure Form. You do not need to include the Frame Step - this is for your reference only. *See appendix for full explanation of frame depth and fraction chart
Label the window you’re measuring on the Measure Form so you can identify it when you enter measurements into the Measure by Indow portal. We use this information to create labels for your inserts so you know which insert goes where.
Note: Please use a unique combination of room and location names for each window.
“Measure twice, cut once” applies here too! As we custom cut each insert to match your windows, we want to ensure a snug fit within your frames. For each window, we recommend measuring twice and filling out two rows of your Measure Form. If the measurements match or are within 1/16" of each other, scratch out a row and proceed. If the measurements differ, remeasure.
Some windows have more than one frame step, while other windows have just a single, flat surface. This example shows two frame steps, (1) in blue and (2) in yellow. For each window, you will be taking a set of 6 measurements which must be taken on the same frame step. A compatible frame step must have:
Use the multi-tool (item 2 in the kit) to check for the above minimums. You can also slide the end of the tool all the way around the window frame to check for obstructions.
Note: For noise reduction, the better frame step is at least 1”- 4” away from the window glass. See appendix or watch this video for more help.


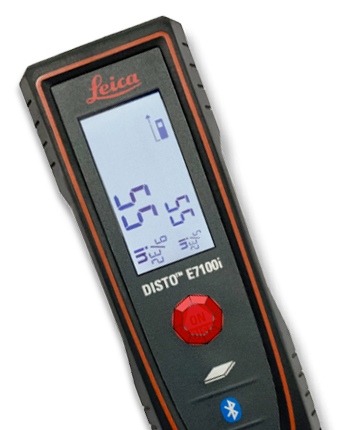
Take out the laser. (Item 1 in the kit.) You only need to use the red ON button and the CLEAR/OFF button.
Place the base of the Laser Measure Tool (side opposite laser beam) on the frame step of the side you are measuring.
Press the red ON button, identified by the jewel, to turn on the laser. Keep your eye on the laser beam to make sure it doesn’t move off the frame step where the insert will be installed. The raised jewel will help you identify the ON button while staying focused on the laser beam.
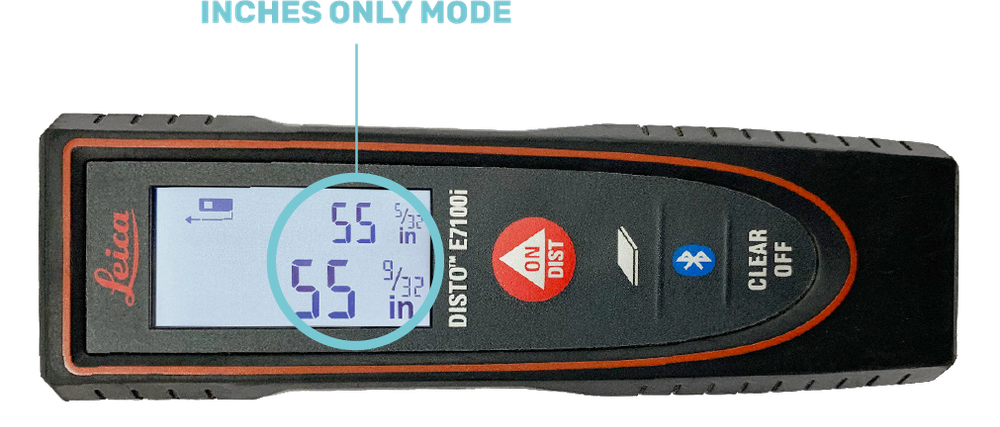
Press the red ON button again to take your first measurement. Your measurement will appear on the screen displayed in inches and fractions. If your laser does not automatically display inches and fractions, see appendix Laser Measure Tool Mode before measuring.
Press the red ON button again to reactivate the laser beam.
Press the red ON button a fourth time to take a second measurement, which will appear on the laser’s screen in larger text below the first measurement. If the numbers match, record your measurement. If the measurements are within 1/16" of each other, that’s okay too - just use the larger of the two measurements. If they are more than 1/16" apart, keep measuring until they are within 1/16th of an inch of each other*.
Record measurements exactly as they are shown on the laser onto the Measure Form, e.g.: 55 9/32. Write the whole number and the fraction with no additional symbols.
Check out our "Your Window With A Laser Tool" video guide or schedule a Measure Support call.
*See appendix for full explanation of frame depth and fraction chart.

Locate the frame step the inserts will be installed on. Place the base of the laser tool against the frame (top left) where the insert is going to be installed, and point the laser beam straight across the window frame (top right). It’s often best for the laser to touch the top and left side of the window, but the tool can face out or down as long as it lies flat against the frame and the laser dot falls where the insert will be installed. Take your measurements.
Note: The laser captures its measurements from the base of the unit, so it’s critical the base sits flat against the frame to get accurate height and width measurements.
Write the measurement on your Measure Form under the column ‘A Width Top’. Record the fractional measurements exactly as your laser displays them. Measure twice! Until you have at least two measurements within 1/16" of each other.

Use the same frame step as before. Press the base of the laser flat against the bottom left side of your window frame with the laser’s beam straight across as seen in the diagram. Record your measurements on ‘B Width Bottom’ on the Measure Form. Measure twice! Until you have at least two measurements within 1/16" of each other.
Tip: Not seeing fractions? See appendix Laser Measure Tool Mode. We recommend you completely measure each window twice and record on two rows on the form. If the rows match or each measurement is within 1/16", scratch one row out.

Using the same frame step as before, place the laser in the bottom left of the window frame pointed straight up as seen in the diagram to measure the height of the frame’s left side. Measure twice! Write these measurements on your Measure Form under ‘C Height Left’.
Now do the same height measurement from the bottom right of the window frame, inputting your measurements into ‘D Height Right’ on the Measure Form.
Tip: Textured surface or a sloped frame causing issues? Mark where the insert will be installed with tape to have a target for the laser.
Take out the Adjustable Diagonal Extension Tool (item 6 in the kit). This stabilizes the Laser Measure Tool against the window frame while you take the diagonal measurements. These diagonal measurements are critical for a snug fit of your Indow inserts.

Think of measuring the diagonals like an arcade game; timing and patience will help you win. Extend the stabilizing leg of the Adjustable Diagonal Extension Tool outward and adjust the tension on the bolt to stabilize the leg. Magnetically connect the laser to the face of the tool so the magnets snap together.

Check for any paint buildup, textured sheetrock, corner gaps, or rounded-off areas in the joints of your frame step. If these are present, take more measurements and look for the longest distance keeping curves and gaps in the frame in mind.
Place the tail of the extension tool in the bottom left joint of the frame step. Adjust the tool’s stabilizing leg along the frame until the laser beam rests in the opposite upper right joint of the frame as seen in the diagram. Keep an eye on the beam to ensure it doesn’t move off the frame step while your other hand is ready to press the red ON button. When the laser dot is in the joint, and equally on the top and side of the frame, take your measurements. Measure twice! Until you have at least two measurements within 1/16" of each other. Write the measurement under ‘E Diagonal Left’ on the form.
Note: The joint is where the two sides of the window frame meet. When you measure from joint to opposing joint, still measure to and from the frame step where your insert will be installed.
Note: Record the fractional measurements exactly as they appear on the laser’s display. The window opening is larger than the laser shows, however the length of the extension tail is automatically added in the Measure by Indow portal.
Repeat instructions for E Diagonal Left, but with the laser and extension tool in the bottom right joint of the window frame pointed toward the top left joint. Measure the diagonal of the right side of the frame and write under ‘F Diagonal Right’ on the Measure Form.
Tip: Be careful! The laser dot moves easily. Want some additional tips? See appendix Diagonal Tool Tips.


Any number of reasons can cause a frame to curve or bow over time. There are convex (outward) bows and concave (inward) bows. Checking for bows ensures your inserts will fit snugly within the frames.
Convex: Stretch the Indow Tape Measure (item 5 in the kit) from corner to corner on one side. Pull it tight to see if there’s a point where the tape isn’t touching the frame (see convex diagram). If you see a gap, the frame has an outward convex bow. Check all four sides of each window.
Concave: Stretch the tape measure across the face of the frame to see if any points of the frame dip toward the window's interior or pass over the tape (see concave diagram).
Note: You can use string, a level, or other straightedge tool if you’d prefer.


If you detect a gap thicker than a pencil tip, follow the directions below. If you don’t detect any bows, continue to Submit Measurements Online.
To measure the height of an inward or outward bow in a frame, tape both ends of the tape measure to the corners so the tape is taut, and use a ruler to measure the height of the bow where the gap is largest. Alternatively, someone can help measure the bow height while you hold the tape measure taut.
If the frame is bowed more than ⅛" (the thickness of a pencil tip), record which side of the frame is bowed – the direction (inward or outward) and the bow height – in the “Notes” section of the Measure Form. Be sure to include where on the frame it’s highest and the start and stop location of the bow in inches. If the bow is on the bottom or top, provide the distance from the left where the gap is largest.
Example: The frame has a 9/32" high inward gap on the left side, three inches from the bottom left hand corner of the sill.

It’s time to enter your measurements into the Measure by Indow portal!
Can't find the link to access your Measure By Indow portal? Contact Measure Support.
Check your email for your Measure by Indow link to access the portal, subject line includes “Measure by Indow”.
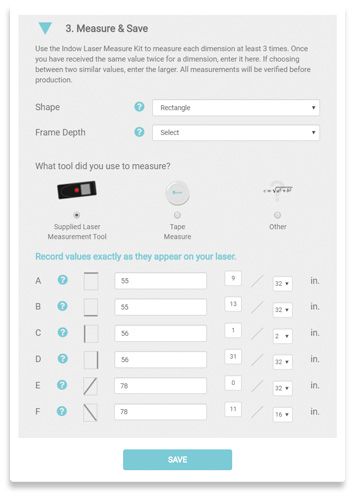
Click ADD WINDOW and add the measurements for your windows, one at a time. Follow along your Measure Form, selecting the larger measurement of the two within 1/16" of each other, as you enter:
Shape: Select Rectangle. Only select Custom if working with a special shape such as an arch or octagon. For custom-shaped windows, please refer to the Custom Order Form.
Enter your measurements as they appear on your Measure Form. Type the whole number in the space provided. Type the top number of the fraction* in the field provided. Use the drop down to select the bottom part of the fraction. Do not enter any additional symbols or spaces. See example:
Tip: If you are entering a whole number, the fraction section will automatically show “0/2”. There is no need to edit.
Notes section: If you found bows, add description here. Note which side is bowed; the direction (inward/concave or outward/convex) as well as the height of the bow.
Review your information before you submit for review. You can always come back to add more windows if you want to start with a few now.
Watch out for typos! Having trouble resolving a red or yellow issue? Select the “schedule a support call” option.
Everything entered and all errors resolved? You’re now ready to submit your order.
Don’t send your Laser Measuring Kit back until your order has been reviewed and confirmed by our experts and payment has been submitted.
Once we receive your measurements, our team will run further checks. When the assessment is complete and any issues have been resolved, we’ll send you a final invoice. You’ll have a chance to review your order before making the final payment.
Important Note: If you feel any items in your order need attention, contact your Fit Specialist before you proceed. Remember, our Snug Fit Guarantee applies to measurements submitted through Measure by Indow as long as certain conditions are met, such as using Indow measurement tools, resolving all errors, and reporting all irregularities (i.e.: bows) in your Measure By Indow portal. For a full list, visit: here.

Tip: Can’t find your link to access Measure by Indow?
Go to: measure support
Once an Indow representative has approved your submitted measurements, you’ll get an email from us so you can confirm your order. Then it’s time to return the kit. Apply the included return shipping label over the existing shipping label and mail the kit back to us in the USPS box in which it arrived.
Remember we can’t ship your order until we receive the kit.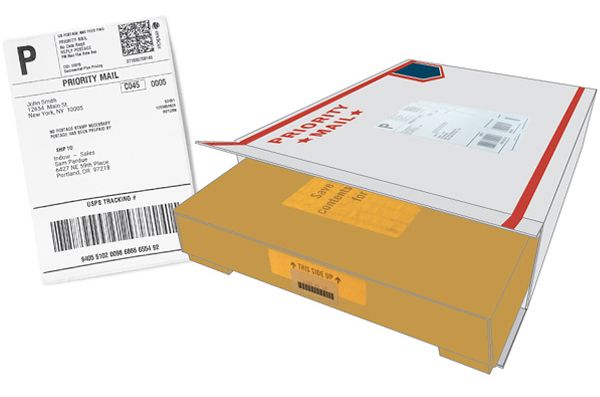
See our Diagonal Guide.
Hold the bottom to create resistance - the legs don’t have rubber so they can be adjusted easily.
Use two hands on the tool to keep it steady when pressing the button.
Place a book in front of the stabilizing (black) leg to keep it steady and prevent sliding.
Hold your finger on the red measuring button and keep an eye on the laser dot.
Enter dimensions displayed on the laser screen. Our system accounts for the length of the extension tail.
Do not tilt the laser towards you or the glass. It should be measuring where the insert will be installed.
If the frame slopes inward toward the glass or outward away from the glass, it can pose installation issues. Use these tips or ask your Fit Specialist if you have compatibility questions.
Your frame cannot have a slope angle that exceeds 15°, but if any slope is present, you should follow these steps. You also need a frame depth of at least ¾".
Check for slope angle with level, default iPhone measure app, or Android measure app (search for “angle meter”).
Measure in from the front of your frame to where you want to install your insert on all four joints and mark with tape.
Use these markings when measuring: for where to place laser tool and where to aim laser dot.
If your frame depth is ¾" - 1", record the location and degree of the slope in the notes field in Measure by Indow when placing your order.

Where two sides or inside edges of the window frame meet. You might think of these as the corners of the window, but they are not 3D because they do not include the glass pane as a side.
See our: Mullion Guide.
A bar of wood or metal separating and supporting panes of glass in window.
Part of the window that holds the panes. It fits inside the window frame and moves inside of it (when the sash is operable). Sashes vary depending on the type of window. For example, sometimes instead of sliding up along the frame, they tilt in or out.
A metal H-shaped bar stationed in the window frame to divide a window into smaller units either vertically or horizontally. Window inserts require mullions for support when placed in extremely large window frames (using two window inserts to cover one opening). View our Mullion Guide here or connect with your Fit Specialist if you believe you need to add Mullions to your order.
Some windows, especially those with a sash, will have hardware which may protrude into one of the frame steps.

An operable window is one that can be opened. Some, usually older, windows have been sealed shut.

The flat surfaces within a window frame. This is what the compression tubing of your window insert will press against. Some windows have just one frame step, some have more. Some frame steps are interrupted by a lower sash or hardware.
A compatible frame step has to be free of any obstructions fully exposed and continuous to have an Indow insert installed. It must also have a frame depth of at least 5/8". Check out our Frame Step video for more information.
How deep your frame step is, measured from front to back. You can measure it by laying the multi-tool flat against the frame step as far back as it goes and sliding it around the frame step. If there are no obstructions you have to move your multi-tool for, you have an approved frame depth for an Indow insert! You just need an approximation for your order:

Note: If you are installing your insert where blinds are present, you will need a frame depth of at least 1 1/4" behind the blinds on the top of your window frame.
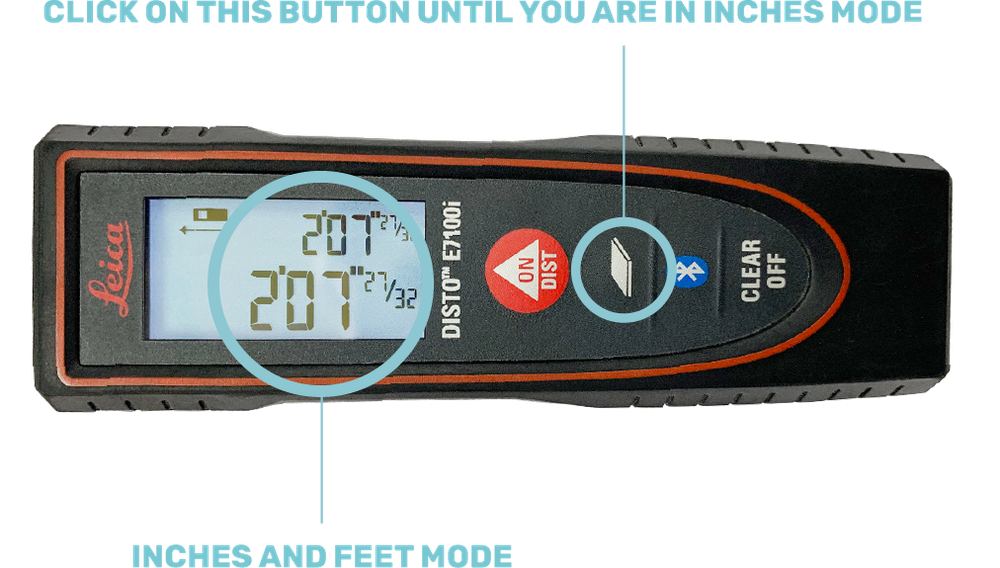
There are multiple modes our laser tool can be in. It should arrive in: “Inches and Fractions” mode as shown on page 5.
If the laser is not in the correct mode: turn the laser on, hold the grey second button down for 2 seconds. It should beep. Repeat this until you see “in” near the bottom left corner as shown in the diagram on page 5.
Now you see why we call it a multi-tool:

Used to hold especially large inserts or those with narrow frames in place. They attach to your window frame and swivel in front of the insert. Test placement with the swivel clip on the side of the multi-tool.
Note: Clips need to be flush with the window frame or wall to the window insert and cannot be attached to plaster or sheetrock.
Used to measure the depth of your frame step.
Used to check for obstructions along the inside of your frame step.
Use this to test how much space the compression tubing will take up in your frame step. Only compress the tubing by a third for an accurate example.
1⁄32
0.03125
1⁄16
0.0625
3⁄32
0.09375
1⁄8
0.125
5⁄32
0.15625
3⁄16
0.1875
7⁄32
0.21875
1⁄4
0.250
9⁄32
0.28125
5⁄16
0.3125
11⁄32
0.34375
3⁄8
0.375
13⁄32
0.40625
7⁄16
0.4375
15⁄32
0.46875
1⁄2
0.500
17⁄32
0.53125
9⁄16
0.5625
19⁄32
0.59375
5⁄8
0.625
21⁄32
0.65625
11⁄16
0.6875
23⁄32
0.71875
3⁄4
0.750
25⁄32
0.78125
13⁄16
0.8125
27⁄32
0.84375
7⁄8
0.875
29⁄32
0.90625
15⁄16
0.9375
31⁄32
0.96875
1
1.000
Indow has insulated more than 23,000 buildings - helping reduce carbon emissions by nearly 200,000 tons - and creating comfort across the US & Canada!
4.49 Average Rating
1519 Reviews
I appreciate everything about the whole Indow window process.
Scheduling and holding a consultation online was easy and seamless. I consultant with KAYA, and he provided a thorough easy-going no pressure to move forward until I was ready consultation.
Incentives were clearly outlined if I decided to move forward and order to be able to make my inserts even more affordable if I acted in a timely manner with measuring and submitting my order as well as returning the measure kit.
The Indow inserts arrived within the expected timeframe and installing them was very easy. One of my favorite parts was watching how to install video, because they used humor, and it really held my attention and put me at ease, allowing me to take in all the little details I needed to insert my Indows correctly.
Within hours, I noticed a temperature shift in the room. It was cooler and more comfortable. The next day when I worked in my office with the Indows the landscaper was across the street with the leaf blower and there was considerable reduction in noise making it a low background buzz instead of a disturbance to the work I was doing. I’ve only had them installed for three weeks and I’ve been so happy with them. It was a great investment for that room in the house that I use for my office.